Wednesday, June 21, 2017

Assigning users to a workflow group from a workflow step

hi there, a lot of times it's required for one user in the workflow to choose some users as the participants for the next step or for example a manager chooses a certain member or user to be responsible for a certain step by assigning this step to a workflow group and putting users inside this group

the old way was to collect users in a property and then assign the users to the workflow group inside of the process designer, with this new trick you can assign users from the case manager UI in any step and modify the list of users and groups inside the workflow group at any step

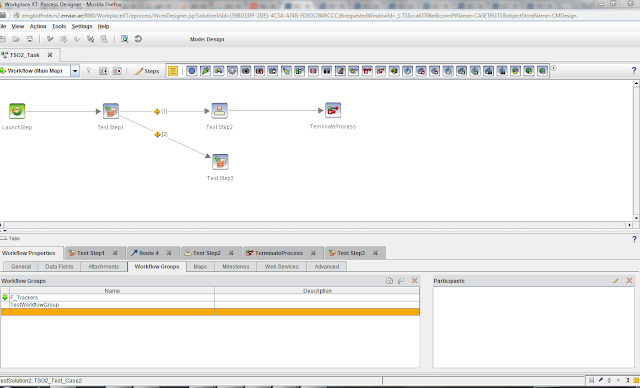
first step i will show you the workflow used for the testing:


in Test Step 1 we will assign some users to a workflow group called Test workflow group and then when we complete the step , a new step called Test Step 2 will be available for all users who are participants in Test Workflow Group


so in Test Step 1 we need to expose the workflow group as a parameter to the step so we can edit it

save the workflow and then create a new properties layout view


  • insert a run time only property , choose it as a workflow field property 
  • put the name of the workflow group which in our case is TestWorkflowGroup 
  • choose the type of property to be workflow group
  • insert all other options you want and save the view , use the view in a workdetails  page and assign this page to be the Step Processor for "Test Step 1"


deploy the solution and test, the result will be as follows


add any users to the workflow group and complete the step , you will see that the users added to the workflow group got a new step in their personal inbasket with name : Test Step 2

that's it and thanks :) 


Friday, June 16, 2017

ICN Custom Plugin Action to ICM Custom Action Trick

Hi there guys , i am back with a new small trick that i learned in the last few days,

a lot of times one will develop a low of custom actions using ICN custom plugin to use inside of the IBM content navigator interface and then the business will require us to move to using IBM case manager and reuse most of the components previously developed for ICN inside of the case manager,

the problem lies in the idea that the ICM Custom Actions are like the ICN Actions with some extra features and configurations like putting a label for the action that is different from the name of the action and also putting a message to be attached to the action as a helper and all of that is implemented as a new Action class of ICM inherting from the ICN Action Class and then extending the new features inside this class, so the old way of converting the ICN Custom Action to ICM Custom Actions was to create a punch of new ICM Actions and use the same code and that will allow for duplication of the same actions to just use them in ICM Widgets but i found that the only main difference is an extra configuration added to the ICN action and then VOILA !!

It's applied as follows : 

Go the the ICN Custom Action Java Class , and we will overide the implementation of  a function in the ICM Custom Java Class called : getAdditionalConfiguration()

the documentation of this function is as follows :
 /**
* Returns additional JSON that will appear on the ecm.model.Action
* JavaScript object for this action. This can be used to provide custom
* configuration information for the action as needed by plug-in provided
* JavaScript for the action.
* @since 2.0.2
* @return an instance of JSONObject containing properties that will be
*         mixed into the ecm.model.Action object. The default
*         implementation returns an empty JSONObject.
*/  

so the idea is to formulate the configuration to be use as ICM Custom Action some we need to put some extra configurations that is :

ICM Compatible to be equal to True
Insert 2 properties for the action : label and message 
then you can use this action as a toolbar on menu action inside of the case manager widgets

the implementation of the function will be as follows : 

public JSONObject getAdditionalConfiguration(Locale locale) {
String jsonString = 
"{" +
"\"ICM_ACTION_COMPATIBLE\": true," +
"\"context\": null," +
"\"name\": \" Custom Action Name\"," +
"\"description\": \"Put Action Description\"," +
"\"properties\": [" +
"{" +
"\"id\": \"label\"," +
"\"title\": \"label\"," +
"\"defaultValue\": \"\"," +
"\"type\": \"string\"," +
"\"isLocalized\": false" +
"}," +
"{" +
"\"id\": \"message\"," +
"\"title\": \"message\"," +
"\"defaultValue\": \"\"," +
"\"type\": \"string\"," +
"\"isLocalized\": false" +
"}" +
"]}";
try {
return JSONObject.parse(jsonString);
} catch (IOException e) {
e.printStackTrace();
}
return null;
}


that's it , thanks and regards  

Sunday, June 11, 2017

Attachment validation that is based on which step response is selected - IBM Case Manager

Hi there, here is a small trick to validate that whatever attachment you have on your step has documents attached to it  and that the attachment content is empty.

 
 the additional validation  will be placed in a Script Adapter widget. 
  • Add a Script Adaptor widget to the hidden widgets area on a work details page
  • Wire an inbound event from the Page Container's Send Work Item to the Script Adaptor's Receive Event.
  • The additional data validation logic will be triggered when the appropriate response button is clicked.

function validateWItemAttachments(propertiesCollection) {
        var emptyattachment = false;
        console.log("emptyattachment Flag is--" + emptyattachment);
        if (propertiesCollection) {
            var k;
            for (k in propertiesCollection) {
                if (propertiesCollection.hasOwnProperty(k)) {
                    var p = propertiesCollection[k];
                    if (p.dataType == "xs:attachment") {
                        console.log("Found Attachment Field--" + k);
                        console.log(p);
                        console.log(p.value);
                        p.retrieveAttachmentContents(function(items) {
                            console.log(items);
                            if (items.length == 0) {
                                emptyattachment = true;
                            }
                        });
                    }
                }
            }
        }
        return emptyattachment;
    }
    var workItemEdt = payload.workItemEditable;
    var coord = payload.coordination;
    var propertiesCollection = payload.workItemEditable.propertiesCollection;
    require(["icm/model/properties/controller/ControllerManager", "icm/base/Constants", "dojo/date"],
        function(ControllerManager, Constants, date) {
            // use the validate coordination topic to handle validation of the
            // the attachments
            coord.participate(Constants.CoordTopic.VALIDATE, function(context, complete, abort) {
                /* Begin Check for attachments for reposne */
                if (context[Constants.CoordContext.WKITEMRESPONSE] === "Send Final SOA For Tenant") {
                    var inValidAttachmentsFlag = validateWItemAttachments(propertiesCollection);
                    if (inValidAttachmentsFlag) {
                        var messageDialog = new ecm.widget.dialog.MessageDialog({
                            text: "Invalid Attachment !"
                        });
                        messageDialog.show();
                        abort({
                            'silent': true
                        });
                    } else {
                        complete();
                    }
                }
                //else then complete the work item as usual
                else{
                  
                    complete();
                }
            });
        });

the general idea of the code is to get the properties collection of the work item than iterating over the collection to get every property with the data type of xs:attachment then we retrieve the content items attached to this property and check the content item list , if the length of the list is there that means that no content items are attached then we raise a flag and make it true ,

we return the flag from the attachment validation function and check it after calling the function , if the flag is true we input an information message that one ot the attachment needs items to be add to it

you can extend the code by iterating over the properties collection and checking each attachment property by name and checking the content list of the items for this property and issue different error messages according to the different properties

you can extend also the validation for any number of responses using this validateWItemAttachments() function 

for further inquires please don't hesitate to contact me

Thanks

Add Documents to Case On Add Case Page - IBM Case Manager

Hi everyone.  As it has been a common requirement for clients to add documents to the case during the adding of the case , here is a simple turnaround that i came across and working fine with me.

This trick will work like this :- after the user fills in the properties of the case and press the add button a new addContentItemDialog will pop up with the case folder specified as the folder to save in the document,
 
On the add case page , add a new script adapter and do the wiring as follows :
image
Then use this code inside the script adapter , it relies on retrieving the case folder once the add case button is pressed and the case folder is created.

calling caseObject.getCaseFolder() won't work as you need to call the plugin service on the case object  coming from the case editable  to retrieve the content item of the case folder as in this moment it's not retrieved by default

here is the documentation mentioned for this part :
/****************************/    

 * The ContentItem for the Case folder in the Case Manager repository.
         * <p>
         * This variable will be null if the case folder object has not yet been 
         * retrieved.  Call retrieveCaseFolder() to ensure this object has been
         * retrieved.
         * @public
        caseFolder: null,

* Returns the ecm.model.ContentItem object corresponding to the case folder.
         * This either represents the Case folder in the Case Manager P8 repository or the
         * proxy folder in the CM8 repository depending on the integration type of the solution.
         * 
         * If case folder has not been retrieved yet, this method will return null.  Call
         * retrieveCaseFolder() to ensure the object is retrieved.
         * 
         * @return ecm.model.ContentItem
         */
        getCaseFolder: function()
/**************************************************/

at last , here is the code snippet:
 
var caseEditable = payload.caseEditable;

caseEditable.getCase().retrieveCaseFolder(function(parentCaseFolder){
var repositroy = parentCaseFolder.repository;
var addContentItemDialog = new ecm.widget.dialog.AddContentItemDialog();  
addContentItemDialog.show(repositroy, parentCaseFolder,true, false, null, null, false, null);

});

of course you can customize the add content item dialog as you wish by changing the parameters passed to the dialog ,using the callback function , use entry templates and you can also choose a default document class using 

addContentItemDialog.setDefaultContentClass("Document Class Symbloic Name");